Event Tour
Communications
The Communications tab inside an event workspace sends and automates email for this one event. It has four tabs: Notifications (automatic emails that fire when a registration changes), Compose (one-off and scheduled emails you write yourself), Scheduled (sends that are waiting to go out) and History (everything already sent, with delivery detail). Open it from the event's Communications tab.
Quick start: (1) pick an Email Sender on Notifications, (2) switch on Registration Confirmation and choose a template, (3) use Compose to send a one-off message or a scheduled reminder. Open and click rates for what you send are on the event's Reports > Email tab.
SMS and Push channels, the SMS Inbox, per-path Automations, the Report tab, Smart Send / recurring / field-based scheduling and static-list audiences are still In Development and are not covered here. They only appear if your org has been given access.
Notifications tab (automatic emails)
Notifications are emails Forge sends on its own when something happens to a registration, with no manual send. Every change on this tab saves immediately - there is no Save button. A status line under the tab bar shows Saving..., Saved automatically at {time} or the error if a change could not be saved.
| Field | What it does | Recommendation |
|---|---|---|
| Email Sender (Send Emails From) | The From address used for this event's automated emails. The list shows the verified organization-wide email addresses in your Salesforce org, and your choice is saved on the event's Automated Email From Address field. Choosing it saves at once and shows 'Email sender updated.' | Pick the address attendees will recognise, such as events@yourcompany.com. If the list is empty, a Salesforce admin must add and verify the address in Salesforce Setup > Organization-Wide Addresses first. Until a sender exists, notifications cannot be set up and the page tells you to choose a from address. |
| CC additional attendee emails for this event | A three-way setting: Inherit tenant setting, On or Off. When CC is on for a send, Forge also copies the extra email-type fields your admin selected (for example a guardian or assistant email on the attendee, contact or lead) onto each message. When it is Inherit, the line under the label tells you whether the organization-wide setting is On or Off. The same rule applies to manual sends and automated sends, but test sends only copy CC addresses when they are sent for a real attendee. | Leave on Inherit unless this event is different from the rest. Set On for an event where registrants give a second contact you must reach (for example parents of student attendees). Set Off for an event where copies should never go out. Which fields are copied is configured by an admin at Admin > CC Email Settings. |
| Automated Emails (four cards) | Registration Confirmation (sent immediately when someone registers), Waitlist Confirmation (sent when someone is added to the waitlist), Spot Available Notification (sent when a waitlisted attendee's spot opens) and Day-Of Welcome Message (sent on the morning of the event with agenda and links). Turn a card on, then choose its template. Turning a card on without a template does nothing until you choose one ('Select a template before enabling automation'). | To make sure every registrant gets a receipt, switch on Registration Confirmation first. For a capacity-limited event also switch on both waitlist cards so waitlisted people are never left wondering. |
| Salesforce confirmation | Shown only when the event still has a Salesforce confirmation email template (Confirmation Email on the event in Salesforce). The card names the template, marks it 'Sent by Salesforce' and links to it in Salesforce. It is view-only: change it in Salesforce. A warning reads 'Attendees may get two confirmations' when that template and Registration Confirmation here are both on, and another says the template cannot be read (deleted or not shared with you). If you lack access to email templates the card still shows, without the template name. The 'no registration confirmation' notice stays hidden while Salesforce sends one. | If you see the double-send warning, turn off Registration Confirmation here or clear the template in Salesforce so registrants get one email. If you see 'cannot be read', check the template in Salesforce or rely on Registration Confirmation here. |
| Template list on Registration Confirmation | Only templates that contain the attendee link merge field ({{AttendeeLink}} or {{conference360__AttendeeLink__c}}) can be chosen. A note says how many templates are hidden for missing it, or that none contain it yet. | Add the Attendee Link merge field to the template so each person gets their personal link to view or manage their registration. |
| Sync warning on Registration Confirmation | If Salesforce sync is not enabled for the org, the card warns that 'Registration confirmation emails won't send until Salesforce sync is enabled for this org.' | Ask an admin to choose Enable Salesforce Sync (Home or Org Settings) before launch. Confirm by sending a real test registration. |
The full trigger list
Under the four cards a Notifications list shows every automatic trigger, with a count such as '3 active of 7 triggers'. Each row has an Enabled or Disabled badge, a template picker you can search, New template, Edit template and Remove. A Sender defaults picker sets the From address used by these triggers. A trigger cannot be enabled until a template is chosen (the tooltip says 'Add an email template to enable this notification').
| Trigger | Fires when |
|---|---|
| Registration confirmation (Registered > Confirmed) | Right away when someone registers and their registration is confirmed. |
| Waitlisted (Registered > Waitlisted) | When someone is placed on the waitlist. |
| Waitlist released (Waitlist > Registered) | When a waitlisted attendee gets a spot and is registered. |
| Cancellation (Registered > Canceled) | When a registration is canceled, declined or rejected. |
| Attendance update | When an attendee's attendance status is updated to any value, for example when they are checked in. Use it for a 'thanks for coming' note. |
| Receipt (Transaction completed) | Once per invoice, when the invoice has a Bill To email and its related transaction is completed. Use it to send payment receipts. |
| Day-Of Welcome | On the morning of the event, with the agenda and links. |
A banner appears if no registration confirmation is enabled ('Configure a registration confirmation email for this event'), because without one nothing is sent when people register. If the Events object has not been mapped, the tab asks you to open Object Mapping first.
Automatic sends are triggered by status changes on the attendee record in Salesforce. Your Salesforce admin can extend the Salesforce side with Flow or Apex, for example to create a task for a sales rep when a VIP registers. See the Salesforce Triggered Sends documentation.
Compose tab
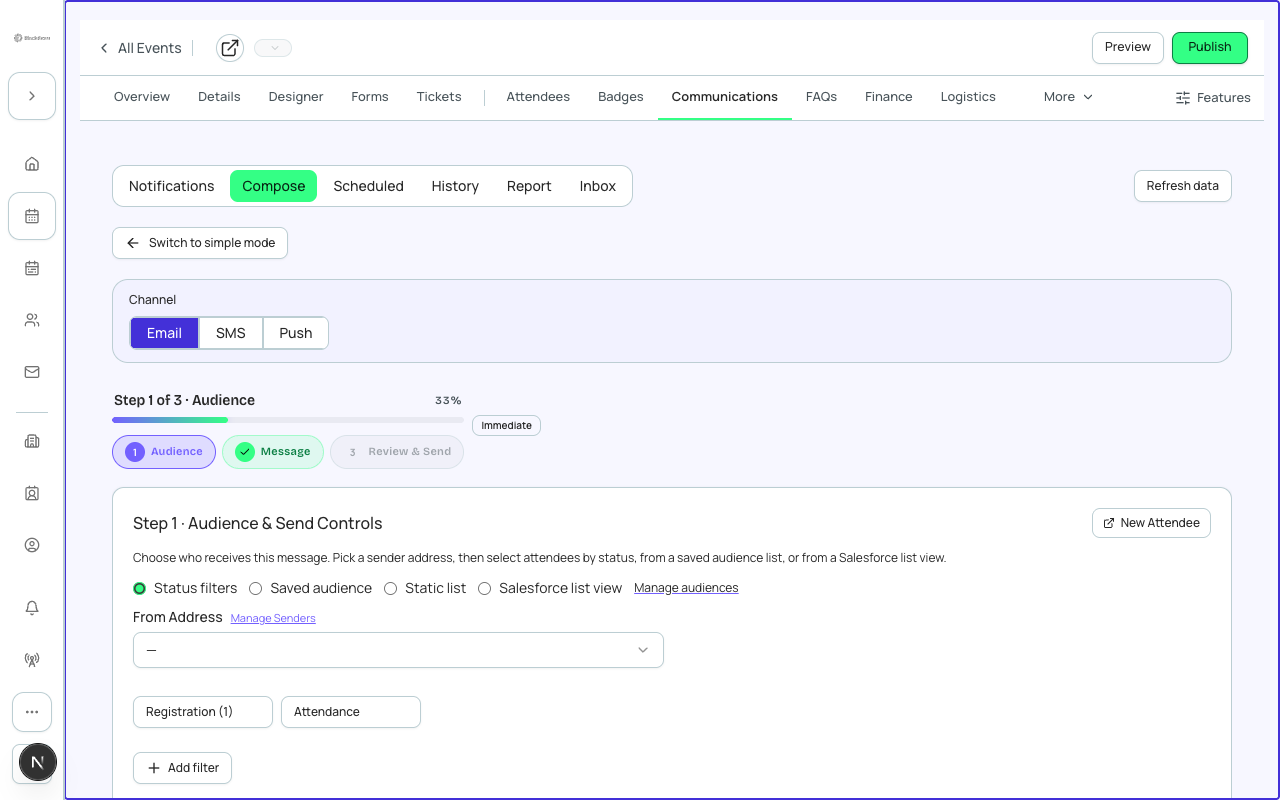
Compose sends a message you write yourself, now or later. It opens as a three-step wizard: Audience, Message and Review & Send. A 'Switch to simple mode' link at the top of the wizard opens a shorter guided wizard (described below). The advanced wizard remembers your progress as a draft while you work.
Step 1: Audience and send controls
| Field | What it does | Recommendation |
|---|---|---|
| New Attendee (link) | Opens the Add Attendee page in a new tab so you can create a missing person before you send. | Use it when someone asks to be included at the last minute, then refresh the audience. |
| Audience mode: Status filters | Builds the audience from this event's attendees. Registration status choices: Lead, To Invite, Invited, Pending, Registered, Declined, Canceled, Waitlisted - Pending, Waitlisted - Rejected, Awaiting Approval, Rejected. Attendance status: Pending, Attended, No-Show. Ticket Type narrows to the people who hold chosen ticket types. Each option shows its count. Custom field filters narrow further by any attendee field. The page shows '{n} attendees match filters' and a sample table you can search. You must tick at least one registration status to continue, and 'To Invite' is pre-ticked. 'All' leaves out Canceled, Declined and Rejected; tick them on their own to reach those people. Searching the sample table also narrows who receives the email. | To reach everyone who is coming, tick Registered. For a day-after thank-you tick Attended. To chase no-shows tick No-Show. To invite people you have loaded but not yet emailed, use To Invite. Always glance at the sample table before moving on. |
| Audience mode: Saved audience | Not offered in an event's Compose: an event's message only reaches that event's attendees. A draft saved earlier with an audience is limited to the event's attendees when it sends. Elsewhere, sends to an audience built in the Audiences hub. A status badge shows Ready, Syncing, Failed or Draft, with Last synced and any last error. Refresh reloads the list; View audience opens it. An audience built from a Salesforce list view must finish syncing before you can send. | Use a saved audience for a group you send to repeatedly, such as VIPs or speakers. Wait for Ready before sending. |
| Audience mode: Salesforce list view | Not offered in an event's Compose. Elsewhere, pick a Salesforce Object (Attendees, Campaign Members, Contacts or Leads), then a List View. Forge previews the list, then 'Sync & use list' copies it into a reusable audience and moves to the next step. The optional Name labels the copy in Audiences. | Use it when your team already maintains the recipient list as a Salesforce list view. Remember the copy is a snapshot taken when you sync. |
| Manage audiences (link) | Opens the Audiences hub in a new tab. | Create reusable lists there instead of rebuilding filters each time. |
| From Address | The sender for this message, chosen from verified senders. The Manage Senders link opens Admin > Email, where senders and the sending domain are managed. It is required before you can leave step 1. | Use the same address as your event's Email Sender so replies go to one inbox. |
Step 2: Message and templates
| Field | What it does | Recommendation |
|---|---|---|
| Message editor mode | Three ways to write the message: Template gallery, Rich text editor and Builder. | Template gallery for speed, Rich text for a plain announcement, Builder for a designed newsletter. |
| Template gallery | Starter templates (Invite light, Invite dark, Confirmation, Reminder, Cancelled, Thank you) plus your own templates. Customize copies a starter into one you can edit; Edit and Delete work on your own templates, but Delete is refused when a draft, queued or scheduled send (including a recurring or paused schedule) still uses the template; the message says how many sends use it and asks you to cancel them first. Show more loads further templates. New Template and Manage Templates open the template editor. | Start from a starter, customize it once, and reuse it. Deleting a template asks you to confirm. |
| Subject / Preheader text | Subject is the inbox subject line. Preheader is the short preview text shown next to the subject in most inboxes. | Keep the subject specific and short; use the preheader for the call to action or date. |
| Rich text editor body | Formatting toolbar for text, links and images. A Content Blocks button inserts event data tables: Speakers (name, title, company), Sponsors (level and website), Sessions (start time and location), Invoice Summary, Invoice Line Items, Attendee Tickets and Session Attendees. They look like {{SPEAKERS_GRID}} in the editor and fill in at send time. Session Attendees shows each recipient only their own sessions, never other attendees. Dates and times fill in readable, in the event's time zone. | To tell attendees what is on, insert the Sessions block. For a receipt-style message use Invoice Summary plus Invoice Line Items. |
| Merge tokens | Insert tokens like {{Attendee.FirstName}} (or the shorthand {{ATTENDEE_FIRST_NAME}}) to personalise each email. The Merge field menu lets you pick an object and a field and shows the token format. | Always open with a first-name token. Use Live merge preview, choose an attendee, and check the subject and body resolve. |
| Builder | A drag-and-drop email designer. You must choose Save Design to lock in the HTML before you can continue. | Use it for branded campaigns. Remember to Save Design after your last edit. |
| Preview Email / Send Test | Preview shows the rendered message. Send Test sends a copy to Recipients (comma-separated) from a verified From address. An unverified sender is flagged 'not verified for sending'. | Always send yourself a test before a real send and open it on a phone. |
Step 3: Review and send
| Field | What it does | Recommendation |
|---|---|---|
| Delivery Readiness card | A collapsible checklist of problems that could stop delivery, such as 'Sending domain is not verified', a missing or pending Single Sender test address, or an event with no sender or registration confirmation. It only shows when something needs attention. | Fix any warning before a large send. Open email settings from the card to finish domain setup. |
| Send Now | Opens a Confirm send dialog with the Audience, a recipient count, the Channel and From. It subtracts suppressed or bounced addresses and shows 'will receive'. It warns if more than 1 in 4 addresses are inactive, or if the audience has 0 recipients. | Treat a high-inactive warning as a reason to clean the list. If the estimate is unavailable you can still send; suppressions are applied at delivery time. |
| When to Send: One-off | Tick Send now to deliver immediately, or untick it and pick a Date and Time (in your browser's time zone). A past date is rejected. | Schedule announcements for the morning in your attendees' main time zone. |
| When to Send: Relative | Direction (Before or After), Amount and Unit (Days or Weeks), counted from the event's start date. Presets: 1 Week Before and Day-After Thank You. | Use 1 Week Before for the logistics email and Day-After for thanks. |
| Delivery Options: Attach ICS | Attaches a calendar invite file to the email. | Turn it on for reminders and confirmations so attendees can save the event to their calendar. |
| PDF Attachments | Invoice receipt PDF (the checkout receipt with line items, per attendee group) and Attendee itinerary PDF (sessions, tickets and perks for each recipient). Leave both unchecked for no attachment. | Attach the receipt to payment follow-ups and the itinerary to the pre-event email. |
| Create Schedule | Saves a scheduled send (a future one-off or a Relative schedule). It then appears on the Scheduled tab. | If the event start date changes, Relative schedules move with it and the Scheduled tab shows the new time. If the new time would already be past, the schedule is paused with a reason and you get a notification: review it and resume or cancel. |
Simple mode (Email Schedule Wizard)
A six-step guided alternative for email only. Who should receive this email: All registered or All attendees. What type of email: Confirmation (sent on registration), Reminder (default 3 days before) or Follow-up (default 1 day after). When: On registration, Days before event or Days after event with a number of days; the event date is shown for reference. Who is it from: a verified From address (Set up email senders if there are none). Choose a template, which you may skip (see the warning below). Review shows a Recipients count for the audience you picked (Counting… while it loads, or Count unavailable if it cannot be counted), then Activate, or Save as draft. A draft cannot be saved with a one-off time in the past, an invalid attendee id or an unknown registration status; the same checks apply when you edit a draft later.
If you skip the template in Simple mode, Forge sends a short generic message ('This is an automated message from the event team.') and makes you tick 'I have reviewed this fallback message' before activating. Choose a real template instead.
Template editor: New Template and Edit Template ask for Template name (required), Folder, Subject (required), Preheader text, an Editor mode (Simple editor or Builder) and the Email body. Merge tokens like {{Attendee.FirstName}} work in the body. Choose Preview to see it, then Save Template.
Scheduled tab
Lists sends whose status is queued, running, paused, scheduled, pending or active, including future one-off sends and standing Relative schedules. Standing schedules show 'Standing schedule' instead of a single time because their run time comes from the event date. Open a row to see its details, or cancel it (Cancel send asks 'Cancel this send?' and cannot be undone, although you can create it again).
History tab
Every send for the event, automated or manual, showing Name, When, Channel and Status. Choose View for the full record.
| Detail | What it tells you |
|---|---|
| Name / When / Channel / Status / Schedule mode | What was sent, when (a real time for one-off sends, 'Standing schedule' for relative schedules), through which channel, and whether it is queued, running or complete. |
| Created / Completed / Total sent / Failed | When the send started and finished and how many messages went out or failed. Failed only shows when something failed. |
| From address / PDF attachments | The address it went out from and which PDFs were attached. |
| +n CC badge | Extra CC addresses were added to the send (see the CC setting above). |
| Audience | The status filters, saved audience or list view that defined who received it. |
| Runs | Each execution attempt with its status and timing. |
| Recent logs | Log lines recorded in this browser only. They are not a complete delivery history. |
| Delivery log | Per-recipient delivery status recorded when the email was sent. 'No delivery records yet' means the send has not produced any. |
To see opens, clicks, bounces and unsubscribes, go to the event's Reports > Email tab. The History tab shows the send itself, not engagement.